In the following article you will learn all about adding width to sewing patterns for different kinds of pattern parts. These special techniques to adjusting the width of sewing patterns will give you all the tools you need to tweak and improve the fit of sewing patterns for all kinds of garments!
When it comes to making clothes wider in sewing patterns, there are lots of cool techniques that are customized for different parts of the garment. If you want to make skirts and pants wider, you can cleverly adjust the fabric by closing darts. It’s super important to keep the shape of the sleeve cap while adding width to the sleeve pattern to make sure it fits just right, and you can do this by making some strategic tweaks. Additionally widening sleeves in the middle takes some careful adjustments, too. When you’re changing the width of a bodice sewing pattern, you might need to move some darts around to make sure it still fits perfectly.
Content:
1. How to add width to Pant Sewing Patterns
2. How to add width to Skirt Sewing Patterns
3. How to add width to Bodices
4. How to add width to Sleeve Sewing Patterns
1. How to add width to Pant Sewing Patterns
In this section you will learn how to add width to pant sewing patterns. Just follow our step by step Instructions on how to adjust your pattern correctly.
Closing darts for adding width to sewing patterns
You can add a certain amount of width by closing the dart. For that you need to draw a line from the dart point to the hem and cut through it. Then you can bring the dart legs closer together or even close them completely. Now you added width to the pattern and your new grainline of the sewing pattern is defined on the cutting line which is closer to the center front.

Adding width to side seams of a pant sewing pattern
If you want to add width to your side seams continue after closing the dart. Closing the dart first and adding width in the middle of the pant first is important, because otherwise you will end up with protruding sides due to the uneven distribution of the width.
After you closed the dart, you can lengthen the hem to the right and left by the same amount, then decide the starting point from where you want it to be wider, for example from the end of the hip curve and approx. 2 cm below the crotch and connect these points with the extended hemline. Lastly connect the new side seams nicely with the previous side seam. Repeat the same step for the back by adding the same amount on each side as you did in the front.

Adding width to the lower leg of a pant sewing pattern
If you just want to add width to the lower leg without closing the darts, you will need to draw a horizontal line on your sewing pattern which has a 90-degree ankle to the grainline. Draw the line at the height where you want to add the width, for example at knee level. Set a point in the middle of that line if you just want to add a small amount of width and connect it vertically with the hem line.
If you want to add even more width to your lower pant leg pattern you can easily draw more vertical lines to the hemline which will make it possible to divide the width between them. Just cut through these lines and unfold the two lower trouser sections that have now been created and add a small amount of width to the side seams. To complete your new sewing pattern, mark out the side seams nicely. The grainline won´t need any adjustments. Repeat these steps for the back while making sure you draw your horizontal line on the same height and add the same amount of width in the middle and on the sides.

2. How to add width to Skirt and Dress Sewing Patterns
Adding width to a skirt pattern or a dress pattern is pretty similar to adding width to a pant sewing pattern. The only difference is that you have no crotch in the dress or skirt pattern.
Make sure that you won’t change the center front when adjusting your sewing pattern. Only ever change your pattern on the side seams and the grainline always remains parallel to the center front. Always make sure you add the same amount of width to the front and the back.

3. How to add width to Bodices
Determining the bust height for a sewing pattern
To add width to your top pattern you will have to determine your bust height. If your sewing pattern has bust dart that goes sideways under the arm towards the bust, the bust point is at the same height as the dart. If your sewing pattern doesn’t have that dart use the tape measure to measure from your shoulder point at the neckline down to the highest point of the bust. Place the tape measure at this point on your sewing pattern and measure vertically downwards. Mark the bust point on the pattern with a dot.
For better understanding on how to measure your bust height you can follow the link to our video tutorial on measuring the bust height.
If you like to learn more about how to measure yourself or having trouble with that, we got you covered. Simply follow the link to our article on “How to Measure Yourself for Sewing Patterns in 7 Steps” or use the video tutorials on how to measure yourself.
If you got the bust height measured, mark it on your sewing pattern and set a dot 2cm below. That will be your final reference point.
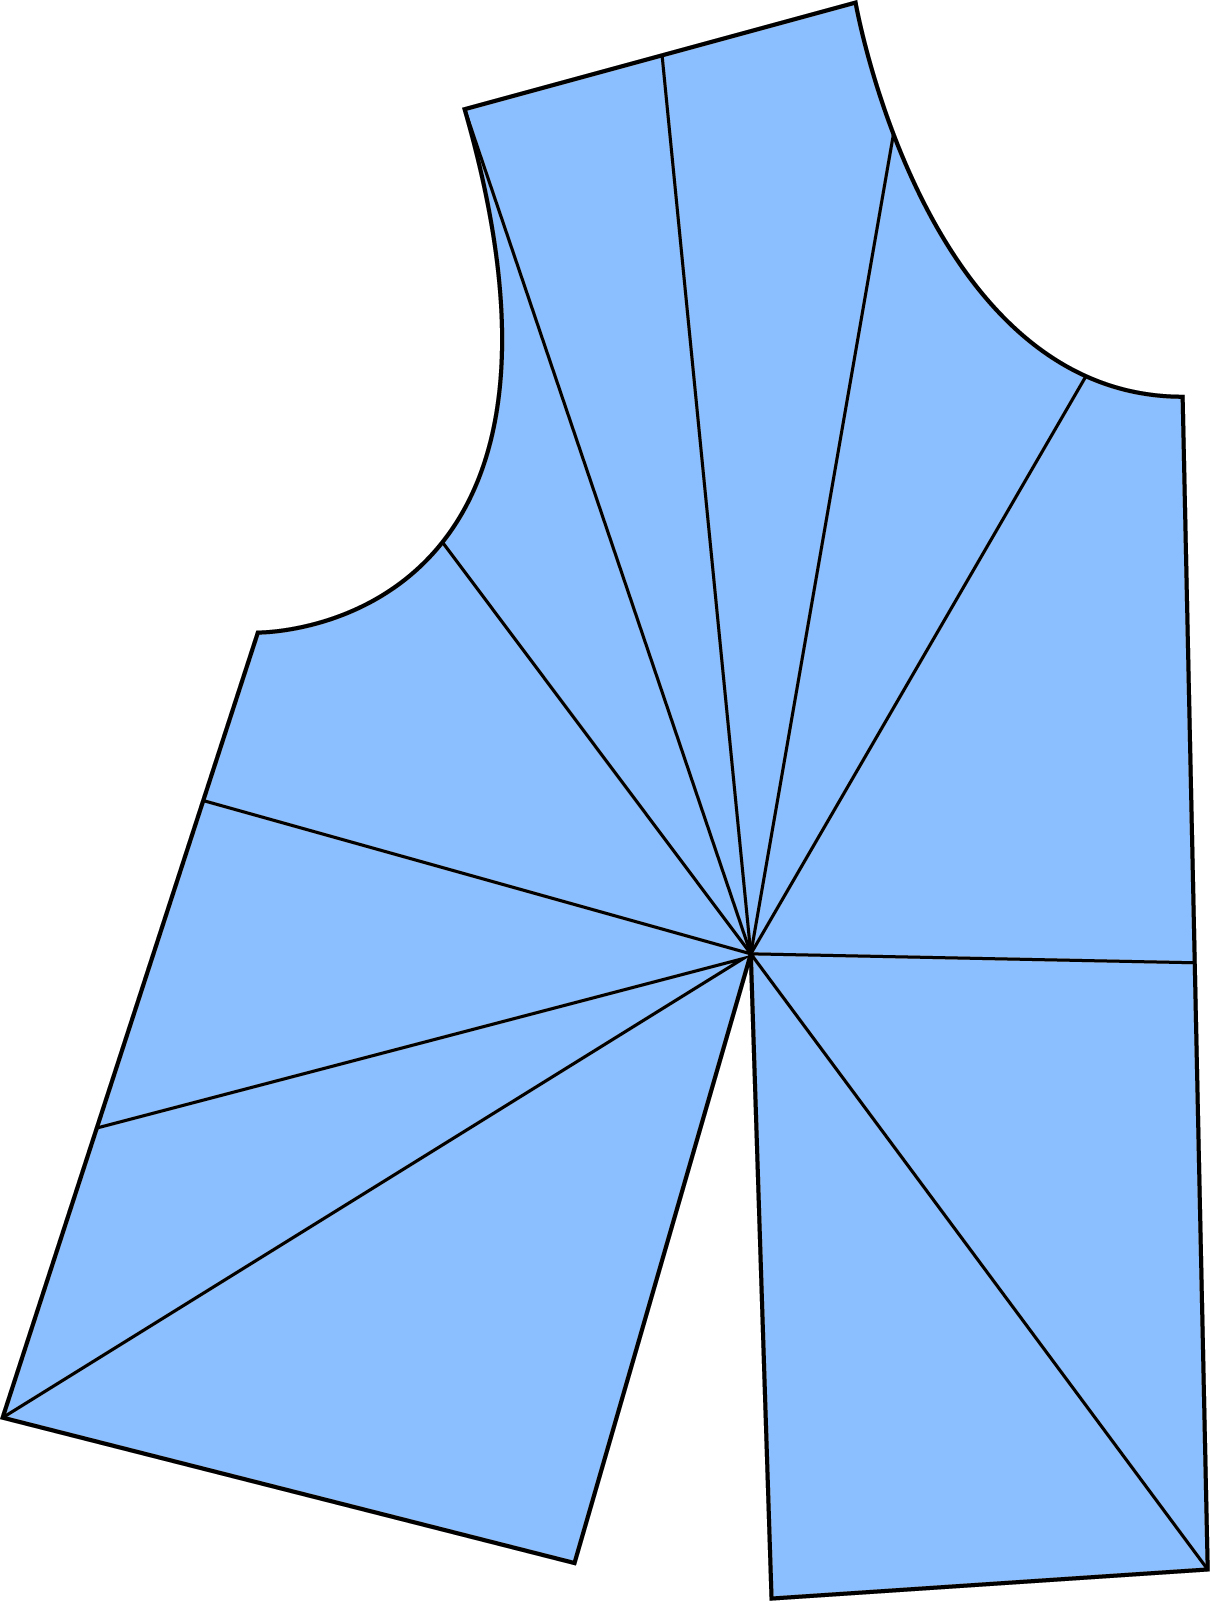
Adding width to a top sewing pattern by closing the dart
Now you need to define where you want to have width in your upper garment. It is possible to add width anywhere in your sewing pattern, you just need to set a dot on the edge of the pattern and draw a line to your reference point. If you would want to add width on the hem for example you would set a point on the hem and draw a line to the reference point, parallel to the center front. In addition, draw a line from the end of the dart to your reference point as well.
For making your adjustments complete you simply need to cut the two lines open to close the dart until the amount of width you wanted to add is unfolded between the second line. How much you open it depends on the amount of width you want to add to the hem.
You can also add width to your shoulder line in case you want to have ruffles in your design or similar design details. However, the armhole should remain unchanged if you don’t want to add rushing or pleats (see in chapter on “How to add width to Sleeve Sewing Patterns”).
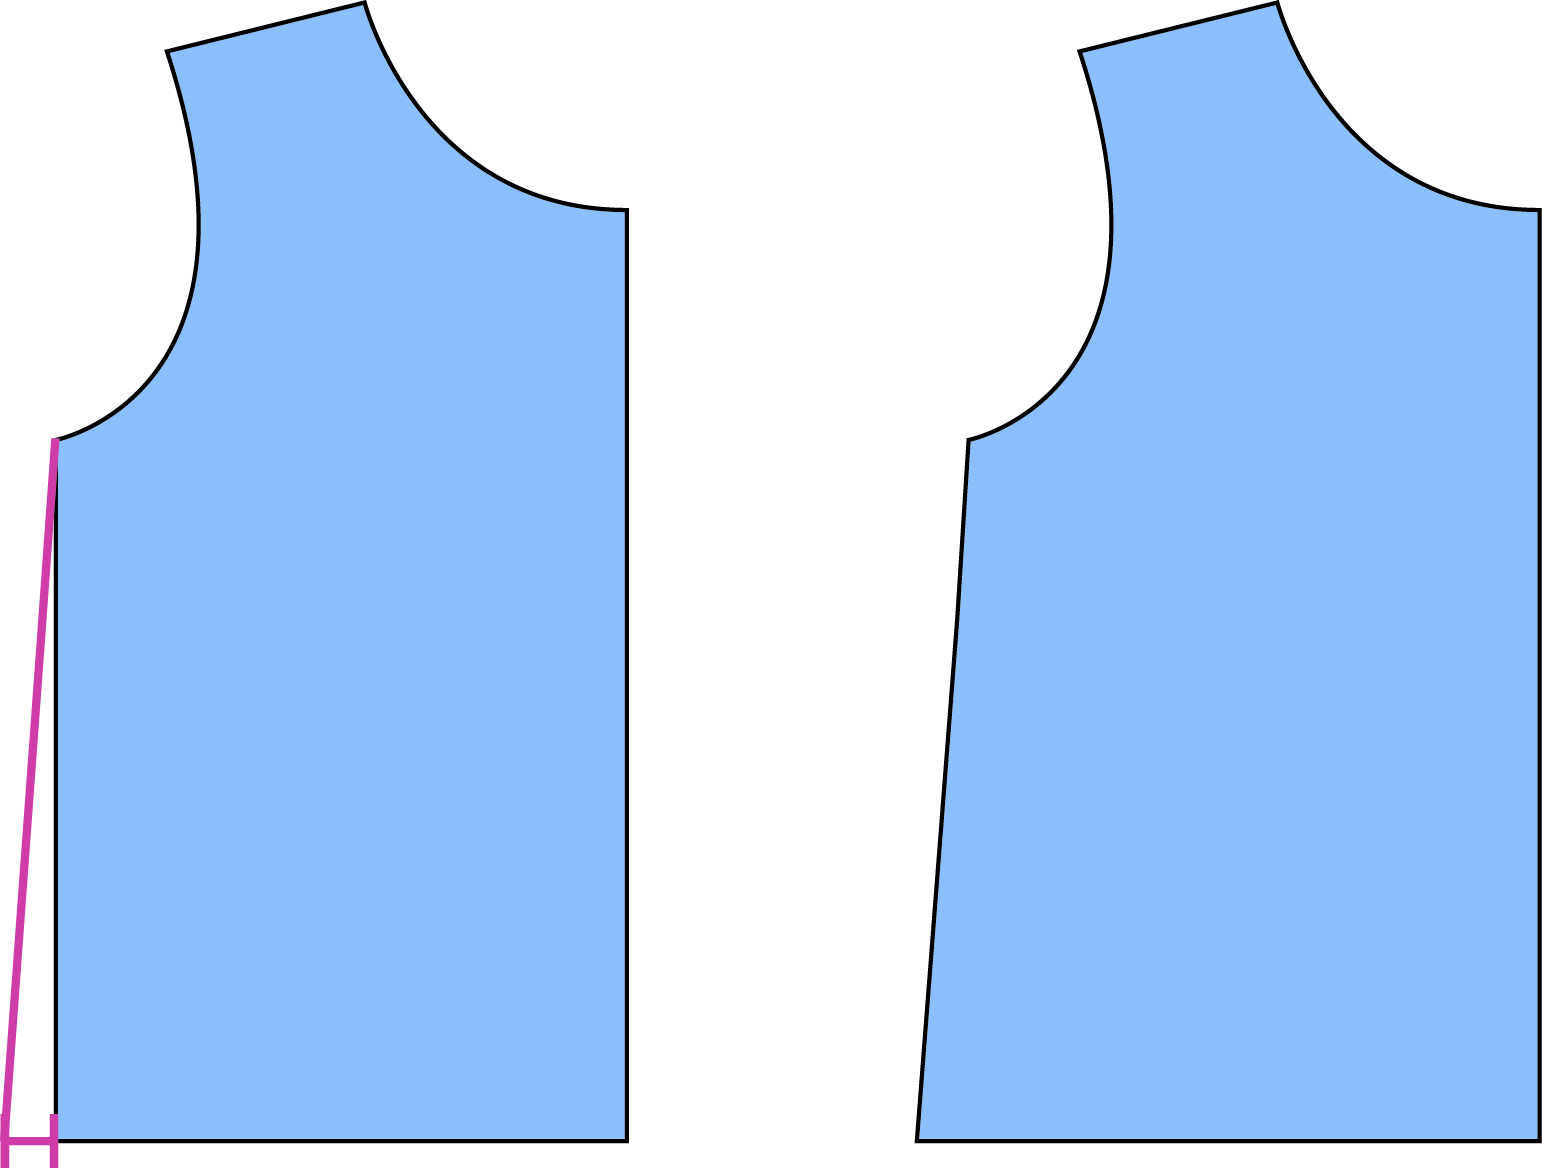
Adding width to the side seams of a top sewing pattern
If you want to add additional width to the sides of an upper garment, please make sure to add the same amount in the front and in the back pattern piece to have an even width distribution on your sewing pattern. You can add width to the sides by extending the hem and connecting the new hem with the lowest point of your armhole.
4. How to add width to Sleeve Sewing Patterns
Adding width to a sleeve sewing pattern is simple once you know which steps to follow. That’s why we made an easy step by step instruction on how to add width to a sleeve pattern for you to follow.
Adding width to the body and hem of a sleeve sewing pattern
Firstly, lay out your sleeve sewing pattern in front of you and draw a horizontal line at 90 degrees to the grainline 4 cm below the two outermost points of the sleeve pattern. Now add multiple lines vertical from that line to the hem of the sleeve pattern. The next step is to cut the lines open and unfold them. Now you can add width at the side seams and mark out your new lines and hem nicely. The grainline remains as before.

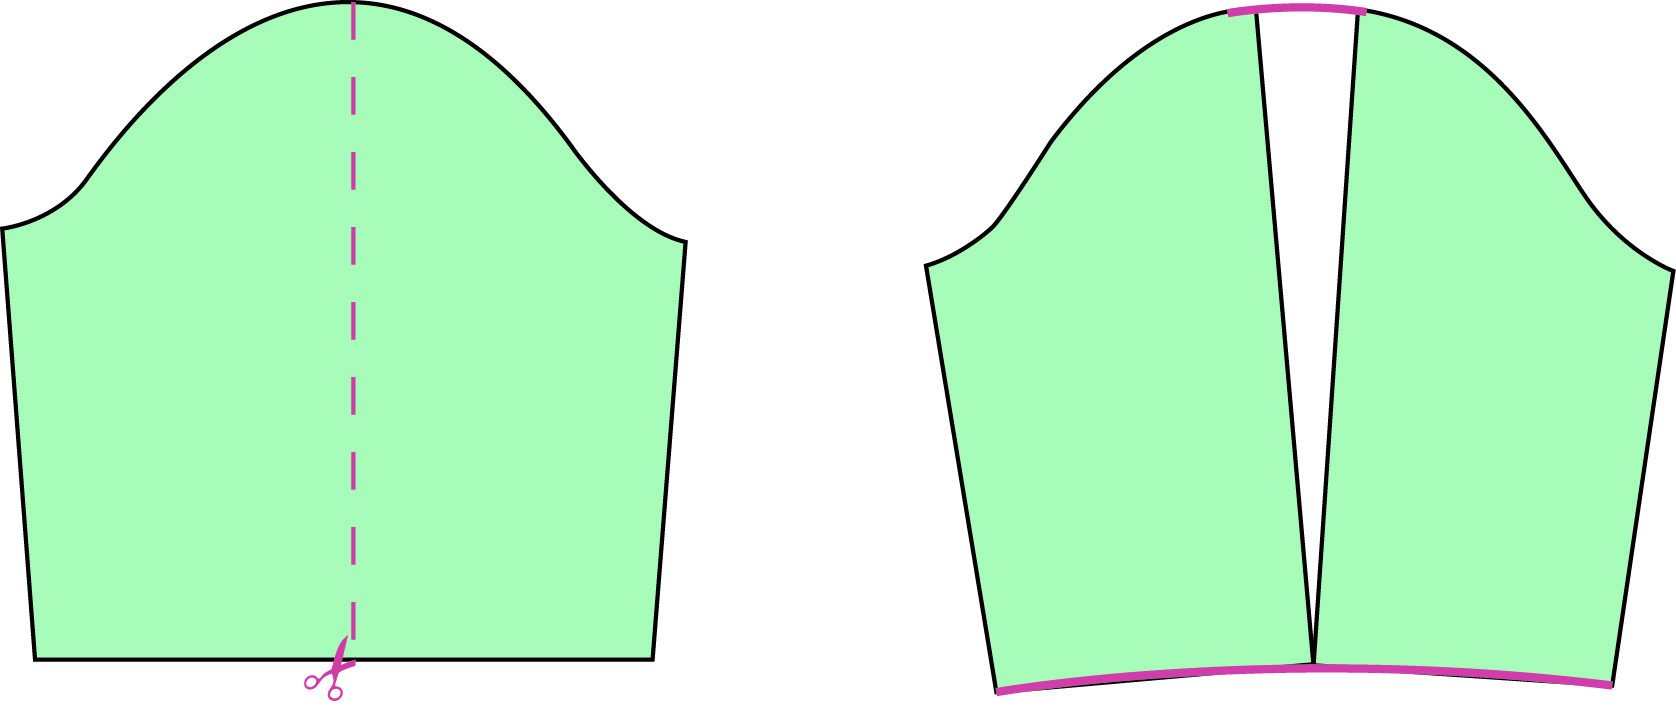
Adding width to the sleeve cap of a sewing pattern
If you want to add width to the sleeve cap you have to consider that the sleeve cap still must fit to the armhole of your garment. That is why you should only adjust the sleeve cap if you want to add for example ruffles or pleats to your sleeve design.
Therefore, you need to draw a line parallel to the grainline up to the shoulder point of your sleeve pattern. Cut the line open and unfold the paper at the sleeve cap until you got the amount of width you wanted to add. The final step is to nicely redraw the hemline of your sleeve pattern so that is curved. The new grainline points down and lies horizontal in the center of the added width.
Adding width to the middle of a sleeve sewing pattern
If you want to add width just to the middle of your sleeve pattern you need to completely divide your pattern piece. Therefor draw a line from the bottom to the top of the sleeve pattern and another line from the left side to the right side of the sleeve pattern and cut them open. The horizontal line will mark the area you want to add the most width to.
After cutting the lines unfold them in such way that the hemline and the sleeve cup line will stay together. The openings are created in the middle of the sleeve sewing pattern. You can finish your adjustments off by nicely redrawing the sides, the hem and your sleeve cap. Also make sure to mark the grainline from the shoulder point vertically to the bottom.

Conclusion
Learning how to adjust your patterns right is always a try and error process. It is totally normal to struggle at the beginning as pattern construction is a wide and complex subject. However, keeping it up is totally worth it! With this blog article on “Adding width to sewing patterns by adjusting sewing patterns” you already have a good overview on how to add width to all kind of sewing patterns! If you want to learn more about adjusting your own sewing patterns have a look at our latest blog post on “How to adjust the length of sewing patterns: Easily shorten & lengthen any pattern”.
You don’t want to adjust your sewing patterns by hand and you are looking for a fast solution to customize your own sewing patterns?
Then the Picknsew® 3D Sewing Pattern Designer will make it easy for you! With the innovative 3D visualisation you can choose from a variety of pattern bases and customize length, sleeves and many other details to suit your personal taste. Try it now!
